Galaxy S3 Recovery – Recover Files from Samsung Galaxy S3/S4/S5/S6/S7
Applies to data recovery from Samsung Galaxy S series, including Galaxy S7 Edge, Galaxy S7, Galaxy S6 Edge plus, Galaxy S6 Edge, Galaxy S6 Active, Galaxy S6, Galaxy S5, Galaxy S5 Active, Galaxy S5 Mini, Galaxy S4, Galaxy S4 Mini, Galaxy S4 Active, Galaxy S3, Galaxy S3 Mini, Galaxy S2, Galaxy S, etc.
It is really terrible if you've deleted some important files on your Samsung Galaxy S3 or formatted its memory card by mistake and lost all the files on it. Since the lost files includes the messages witnessed the love between you and your boyfriend/girlfriend, the photos taken at happy moments with your friends, the videos recorded the cheerful days with your family, your favorite music, some important contacts, created documents and interesting ebooks, you may be eager to recover the files very much. Easy! This guide will teach you how to recover files from Galaxy S3 and its memory card step by step with the help of professional Android data recovery software and memory card recovery software.
Before recovering files on your Galaxy S3, it's recommended to stop using it right away once you find this issue, (especially stop using the functions that need to write data to the phone or the microSD card that has the lost files), since the deleted or formatted files may be overwritten by the new files and the overwritten files may be even harder to recover.
In this tutorial, 2 ways to recover deleted files from Galaxy S3 will be introduced:
1. Recover deleted messages, contacts, call logs, WhatsApp messages, photos, videos, audios and documents from Galaxy S3 with Android data recovery software;
2. Retrieve deleted videos, audios, images, emails and archives from Galaxy S3’s phone memory and mircoSD card with memory card data recovery software.
Method 1: Recover deleted files from Samsung Galaxy S3 using Android data recovery software
Tips:
1. This method works for recovering deleted text messages (SMS), MMS, call histroy, contacts, WhatsApp chat history, photos, videos, audios, documents and more from Galaxy S3.
2. Please make sure the battery life of your Galaxy S3 is higher than 20% to ensure a complete recovery.
Android Data Recovery (Dr.Fone for Android) is the world’s first Android data recovery software that supports to recover text messages (SMS), MMS, WhatsApp messages, contacts, call logs, photos, videos, audios, documents and more from 2000+ Android phone and tablet models made by Samsung, HTC, LG, Google, SONY, Motorola, Amazon, Asus, etc.
Free download the Galaxy S3 data recovery software using the following button.
Follow the easy steps below to recover data from Galaxy S3:
Step 1:
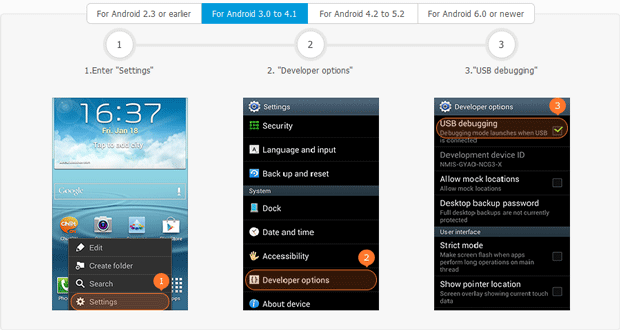
Enable “USB debugging” on your Galaxy S3:
For Galaxy S3 running Android 4.0 and 4.1:
Tap “Settings” > “Developer options”, then toggle the “USB debugging” checkbox;
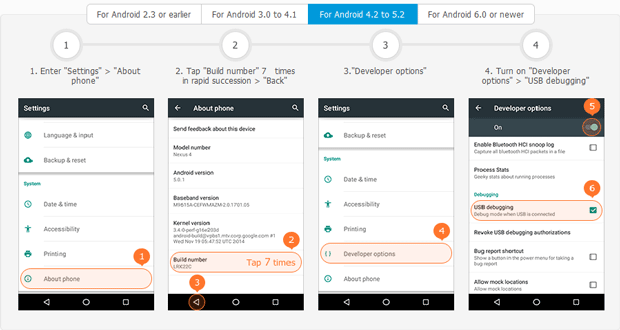
For Galaxy S3 running 4.2 or later:
Go “Settings” > “About phone”, tap "Build number" for 7 times until the message "You are under developer mode" pops up. Then go back to “Settings”, tap “Developer options” and activate “USB debugging”.
Step 2:
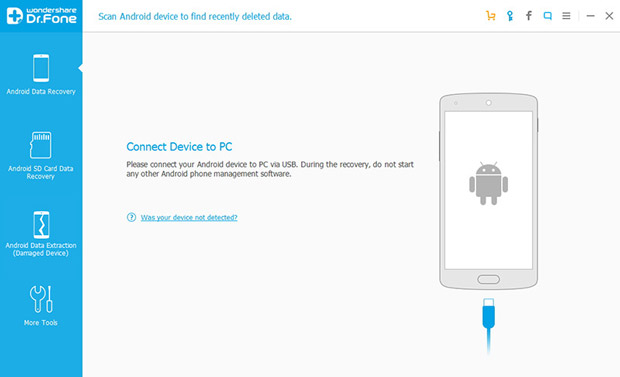
Run the Galaxy S3 data recovery software, and connect your Galaxy S3 to the USB port of your computer using the USB cable came with the phone.
Step 3:
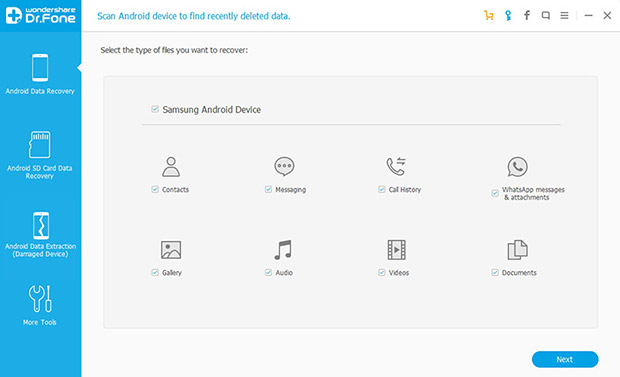
When the Galaxy S3 file recovery software discovers your device, you’ll be asked to select file types that you want to recover from the Galaxy S3. Then click “Next” to proceed to the next step.
Step 4:
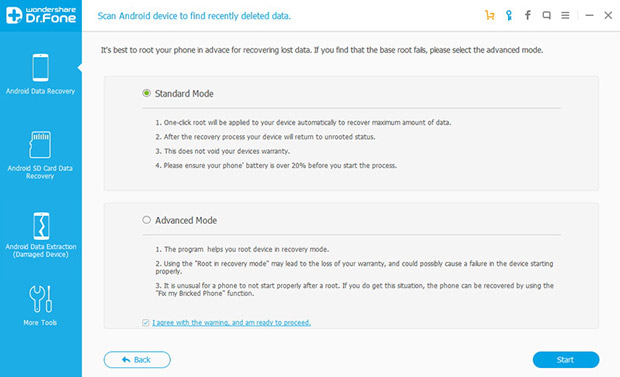
You are allowed to either scan all the files or only the deleted files on Galaxy S3. If you cannot find the lost data with the Standard Mode, you can try the "Advanced Mode".
Step 5:
If your Galaxy S3 has been rooted previously, the software will automatically start to get information of the device, analyze it and then scan the data on it.
If your Galaxy S3 has not been rooted prior to the recovery, you’ll be required to apply one-click root to the device. Take it easy! The rooting won’t have any effect on the warranty of the device as it only stays rooted during the recovery process and will go back to unrooted after this.

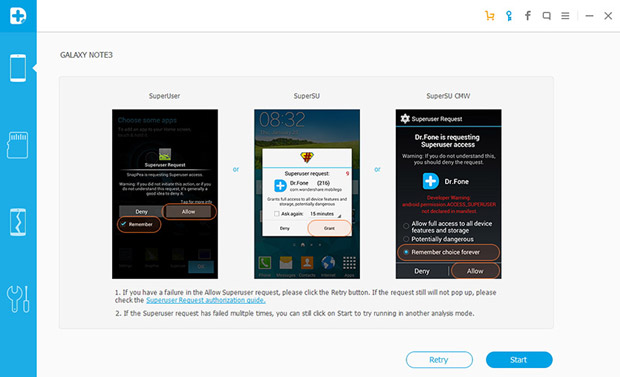
You may need to tap “Allow” on your S3 to give the software Superuser authorization to scan your device. Then, just click the “Start” button on the software to let the software scan your S3.
Note:
1. "Allow" may pop up on your device for several times, please tap it until it doesn't appear again.
2. Don’t disconnect your Galaxy S3 when the software is scanning your device. Disconnection may lead to the failure of the scan.
Step 6:
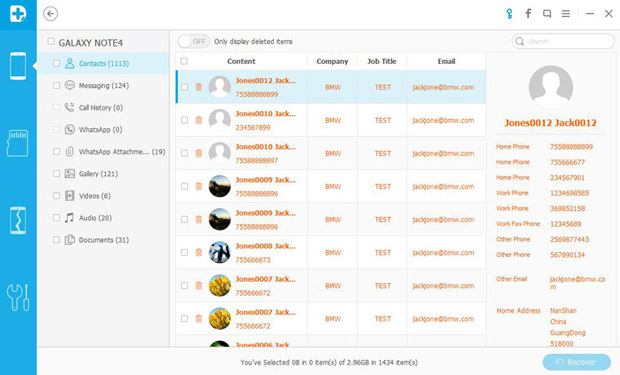
It may take some time to scan Galaxy S3, depending on the quantity of the files on your device. After the scan, all the recoverable data will be listed by categories on the left sidebar. Preview and mark those that you want to recover from the Galaxy S3, and then click “Recover” to save the files to your computer.
Note:
1. If you selected “Scan for all files” of the “Standard Mode” in step 4, all the found messages, contacts, call logs, photos, videos, audios, documents and WhatsApp chat history on the Galaxy S3 will be displayed, including the ones that have never been deleted. The deleted messages, contacts, call history and WhatsApp messages will be shown as red.
2. The contacts recovered will be saved as .csv, vCard (.vcf) and .html files, you can import the vCard files to your Galaxy S3 with the help of this Android file transfer. The found messages (including texts and WhatsApp messages) will be saved as .html and .csv files. The found call history will be saved as an .html file. Photos, videos, audios and documents found will be save as originals on your computer.
Method 2: Recover data from Samsung Galaxy S3 with memory card data recovery
Tips:
This method works for recovering deleted videos, audios, images, emails and archives from Galaxy S3's phone memory and microSD card. If you want to recover deleted text messages (SMS), MMS, contacts and WhatsApp chat history from S3, please using Method 1.
To recover files from Samsung Galaxy S3 using Method 2, first download and install the memory card data recovery software on your PC or Mac.
The memory card recovery software can recover all kinds of lost, deleted, formatted or even damaged photos, videos, movies, music, documents, PDF ebooks and archives from the phone momeory and microSD card of your Galaxy S3.
Follow the steps below to retrieve your files on Galaxy S3:
Step 1:
Connect your Samsung Galaxy S3 to the computer with the USB cable came with your device.
Note:
Please make sure that the USB divers for the Galaxy S3 are installed on your computer. If not, download it here first.
Step 2:
Once connected, your device will display a notification that your Samsung Galaxy S III is connected as a media device.
1. Drag the notification bar down;
2. Tap “Connected as a media device”;
3. Tick the checkbox of “Media device (MTP)”.
Step 3:
Open the Galaxy S3 recovery software, and by default, you'll enter the "Wizard Mode". Click "Next".
Step 4:
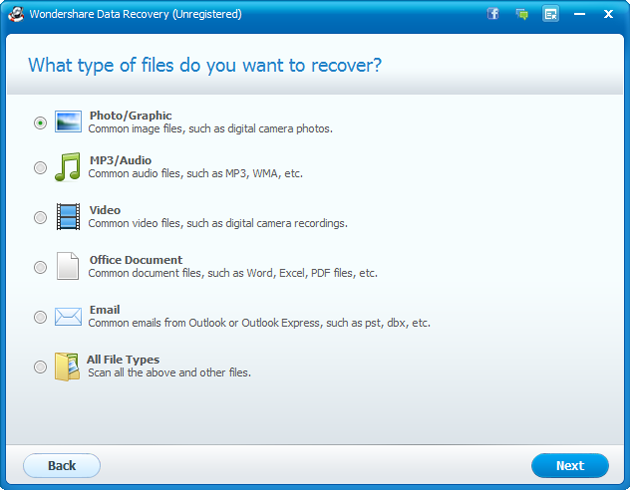
Choose the file type that you want to recover from your Galaxy S3: select any one from the options: "Photo/Graphic", "MP3/Audio", "Video", "Office Documents" and "Email". Or you can select "All File Types" to recover all the files on your Galaxy S3.
Step 5:
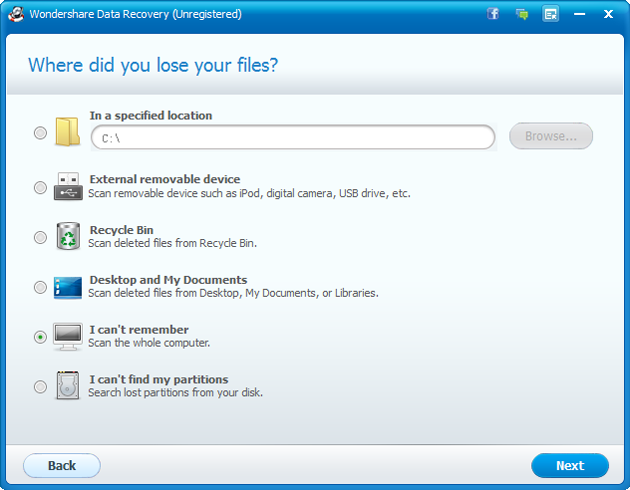
Specify the location that you lost your files. You can specify the directory of your Galaxy S3's phone memory or memory card (microSD card) manually or make the software to automatically detect your Galaxy S3 by selecting "External removable device".
Step 6:
Click "Start" to scan your lost files. To recover formatted files, check the "Enable Deep Scan" option which will take you more time.

Step 7:
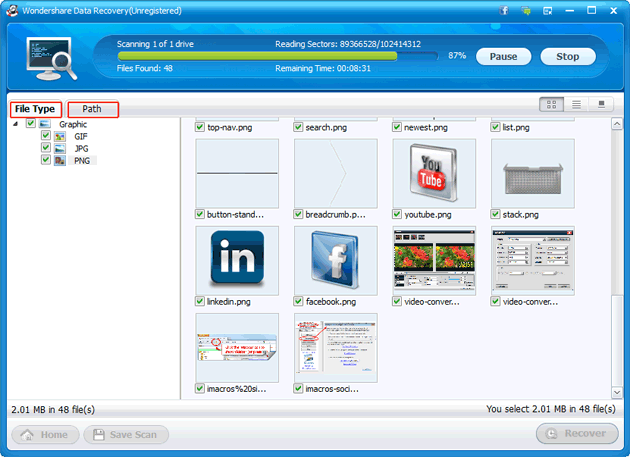
After a short while, you can preview the files discovered by scanning and recover the files lost on your Galaxy S3.
IMPORTANT:
Do not save the scanned files to the phone memory or memory card of the Galaxy S3 to avoid the deleted files being overwritten. It's recommended to save the discovered Galaxy S3 files to a location on your PC or Mac.
You may also like:
- How to recover deleted texts on Android, iPhone and BlackBerry
- How to convert DVD to Nexus 7
- How to convert videos to Nexus 7
- How to rip DVD to Surface
- How to play DVD on Kindle Fire HD
- How to watch DVD on iPad 4

